A quick note on SIP
SIP, short for Session Initiation Protocol, is a framework protocol defined by the Internet Engineering Task Force for multi-party multimedia communication.
It is a text-based application-layer control protocol and does not depend on any specific underlying transport protocol. Its role is to establish, modify, and terminate two-party or multi-party multimedia sessions over IP networks. In the SIP framework, the common service roles include the SIP User Agent Client (UAC), SIP User Agent Server (UAS), SIP registration service, and SIP redirect service.
There is already plenty of detailed material available on SIP itself. The goal here is more practical: set up an open-source SIP server with Kamailio in a local network, then use clients and packet capture to get a clearer view of how SIP interactions look in practice.
Scope of this setup
This deployment is only suitable for testing and learning inside a LAN. Security and performance considerations for an Internet-facing deployment are not covered here.
The installation below uses the official RPM package approach for Kamailio.
Installing Kamailio
First add the repository source:
cd /etc/yum.repos.d/

wget http://download.opensuse.org/repositories/home:/kamailio:/v5.3.x-rpms/CentOS_7/home:kamailio:v5.3.x-rpms.repo

yum makecache
Install Kamailio and start the service:
yum install kamailio

# 启动
systemctl start kamailio
Open the SIP port used in this test:
firewall-cmd --add-port=5060/tcp --permanent
firewall-cmd --reload
Basic configuration
Edit the configuration file /etc/kamailio/kamctlrc.
Set SIP_DOMAIN to the server IP address, set DBENGINE to SQLITE, and uncomment DB_PATH. Since this server is only used to observe SIP interaction flows, the configuration is kept as simple as possible.
## your SIP domain
SIP_DOMAIN=192.168.103.236

DBENGINE=SQLITE

DB_PATH="/usr/local/etc/kamailio/dbtext"
Install the SQLITE module:
yum install kamailio-sqlite
Initialize the database:
# 创建目录
mkdir /usr/local/etc/kamailio

kamdbctl create

Create a user with the following command. The two parameters are the username and password:
kamctl add dong dong

Authentication is not enabled in this setup, so logging in directly is still possible even without initializing users.
Restart Kamailio for the configuration to take effect:
systemctl restart kamailio
Run netstat -tunlp | grep 5060 to confirm that the service is listening on port 5060.

If the service fails to start, use the following command to inspect the output:
kamailio -M 8 -E -e -dd
Connecting clients
Install a SIP client on two computers that can both reach the Kamailio server.
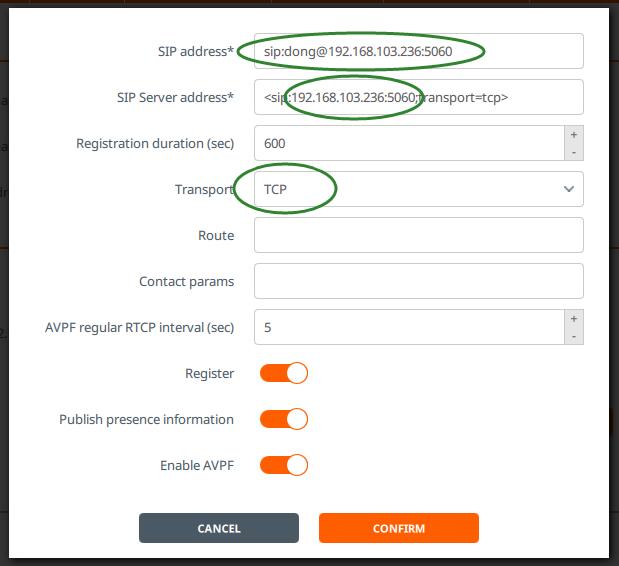
When adding a new user in the client, configure the server IP address and port number. The protocol needs to be set to TCP.
After logging in from both clients, call the other user registered on the server from the client home screen.

Once the call is answered, audio and video communication can be performed.
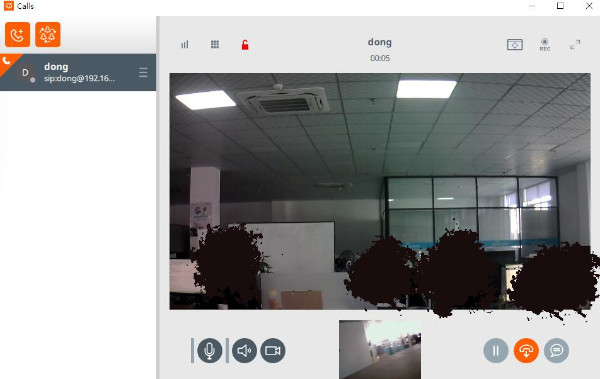
At this point, Wireshark can be used to capture packets. Watching the SIP packets directly makes the SIP process and message structure much easier to understand.
A simple two-server test
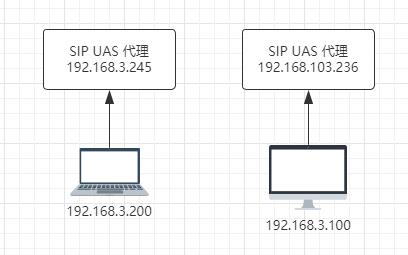
Kamailio can also be deployed on two servers at the same time. In this test, two client computers connect to different servers. When user dong in the 192.168.103.236 domain sends a request to user gimp in the 192.168.3.245 domain, communication between the two sides is possible.

In this case, the Kamailio server acts as a proxy. It forwards the request sent by the user through itself to the specified service address.
After SIP servers are cascaded, a client can be uniquely identified by the combination of username and server address.
SIP also has an important role in video surveillance systems, which is worth exploring separately later.